
6-Unit Project Management Case Study
This is a detailed case study of a 6-unit new construction apartment building that was completed recently. You'll see pictures of the finished building and then I will walk you through my work flow of how I performed a post-construction costs analysis, and then used the REAL data from a completed project to create a detailed template to estimate future projects very quickly.
If you do rehabs or new builds, then watch this to learn how to cut tens of hours off your time when it comes to estimating rehab/construction costs for future projects!
Video Transcript Below
What's up, guys, it's Daniil Kleyman. I just finished this project and I wanted to record this really detailed video and case study/tutorial for you, on how this project turned out, but more importantly, how I'm using the data from this project in order to much more accurately estimate my future projects.
So, this is a six-unit building that I just finished. I'm getting ready to break ground on the 14-unit building, new construction 14-unit apartment building, in literally two weeks now, and I'm able to take the data from this project, real costs, not theory, things… I know what things cost now, in real time, and I'm going to show you how I'm using that data to budget my future projects.
So, if you currently rehab houses, if you do new builds, if you do residential or commercial, or if you want to start, then this is for you. I'm going to show you how to save huge amounts of time predicting costs on your project, and I'm going to show you how to avoid very expensive mistakes. If you're just wholesaling, then this is probably not the video for you to watch. I don't know how valuable or impactful this will be to you if all you're doing is just flipping contracts.
So. I just finished a six-unit apartment building, new construction, I'll show you pictures of it. It turned out awesome, but I also went over budget. The project still turned out very profitable, but I went over budget. I'm going to show you some things where I made mistakes. I'm going to show you my budget. I'm going to show you what I actually spent, and I'm going to show you real numbers.
Look, I'm not some guru that only does theory. I am a full-time investor and developer. Everything that goes into our software comes from real-world experience. But I'm not perfect, I'm not an expert on everything, and as I'm scaling my business, I'm learning, and I'm making mistakes, and I'm pretty open about what I get right, what I get wrong. I'm going to be open here with you and show you where I made mistakes and where we went over budget.
But the key is to learn from that. If you keep making the same mistake over and over again, obviously you're gonna keep losing money. So, the key is, it's okay to make mistakes as long as you learn from them and properly take that data into account on your next project.
So. I'm going to show you my workflow of how I took my costs from this project and created a framework to much more accurately and quickly estimate my next multi-family project.
So. Accurately estimating your cost on your projects is absolutely crucial, and you already know this. It can mean all the difference between a profitable project and total disaster. I bet there are some deals that you probably would have never even bought had you known ahead of time what your true costs would have been. There are other deals that you would have paid less for had you accurately been able to budget for all the unknowns. So, the skills that I'll teach you here, and the skills I continue to try to teach through my trainings, and by continuing to improve our software in order to give you the tools to do smarter deals, and to have better data, these are skills that are absolutely invaluable if you're serious about being in this business.
So, if you take the time to pay attention to what I'm going to show you, and that's the key, and then implement and replicate what I'm doing here, you'll be able to easily predict your true costs on the project no matter how complex, keep track in real time of where your project stands without a bookkeeper. You can do this yourself in seconds, or a virtual assistant can help you, or you can have your bookkeeper help you. You're going to be able to create detailed pre-project and post-project reporting for your lenders, partners. I'll show you reporting that you can use to supplement your funding presentations. In particular, I'm going to show you how to create detailed budgets that every legitimate lender is going to ask for.
This can be applied to single-family houses, this can be applied to multi-family buildings, but the point is, none of this stuff is sexy. Now, you can go and you can watch some video on how to make quick five grand wholesaling a house and that's great, but that's not what's going to turn you into a real, legit, scalable, rehabber, builder, developer. These are the skills, this is when we go deep. This is when we go deep into the numbers, this is when we go deep into the math, but this is what will allow you to accurately predict your costs in future projects and not lose money, achieve the right profit margin that you desire, and stay in business.
Because guess what? As our market keeps climbing higher and higher and gets more and more competitive, people are falling off nonstop. I can't tell you how many rehabbers in my local market are out of business already, because they got overextended on their financing, they got overextended on their projects, they underestimated what things were going to cost and ran out of money. So, I'm taking the time to record this stuff and continue to put out this education to hopefully prevent you from being one of those cautionary tales. All right? So, let's keep going.
Here's the workflow that I'm going to take you through. Number one, we're going to evaluate the finished project. There was a budget that I created when I started and throughout the project I modified that budget, but I basically had a budget, what I thought things were going to cost. Over the course of the project, I kept track of my actual costs, to the penny, which you will be able to do as well. At the end of the project, I want to sit down and I want to compare my actual versus my budget and see where we went under, where we went over, and what things truly ended up costing, and what mistakes we could learn lessons from.
After that, I'm going to clone that deal and create a separate version of it because I want to keep my original. I want to have that in my records. I want to have that in my archives, what my finished project looked like versus my budget. Then I'm going to clone that deal and I'm going to take my actual numbers and turn them into the new budget, and I'll show you exactly how to do this. And then I'm going to use that to create a new template that I can then easily use to project future deals, and project costs on future deals. And then I'm going to use that template to budget my future projects. So, don't worry if this doesn't make sense yet. I'm going to show you exactly how to do all this.
But first let me show you this awesome apartment building that we just finished. All right, so this is probably one of my favorite projects to date. This is a six-unit apartment building that I built ground-up. It's actually right next to a duplex that I did a full gut renovation on, and the land… One of the cool things is if you know how to identify value in the land, you can value deals completely differently than what most people that will look at the same deal. So, I bought the duplex and I paid more for the duplex than other people were willing to, because I knew that it came with all of this vacant land next to it that I could build another apartment building on. And so, I essentially got the land for free for this project, and it turned out beautiful. New construction, brick… Brick is expensive, but because this is in a historical area, I had to build brick.
One of the things that I'll talk about in a second is I completely failed to budget for this retaining wall, because the lot was already sloped towards the sidewalk and there was no wall there, so I just didn't think that we would need a retaining wall, or the stairs. So, that's one of the things where I went way over budget on this, having to build this massive retaining wall.
But the project turned out amazing. We have on the back these huge 10×22 balconies that are overlooking the skyline of Richmond city. Ton of natural light. Ground floor is concrete. By the way, if you are in our Rehab Valuator inner circle, then you had an opportunity about a month ago to walk this project with us and see it for yourself. Hint, hint, this is my subtle way of telling you you should join our Rehab Valuator inner circle if you're not a member, because we do weekly trainings, but we also, if you are anywhere near Richmond, we do these property tours every few months now, and we have members driving down from Baltimore and from D.C. and from all over to come and see real projects that we're doing.
But anyway, the first floor is stained concrete. So, we pour a slab and then this is the foundation and the finished flooring, we did an industrial look on the first floor with concrete floors, exposed sprinkler pipes, industrial looking light fixtures. But beautiful gray cabinets, stainless steel appliances, white quartz countertops, really pretty vanities. There are certain things that I spent kind of extra money on to really make sure that we're attracting high-quality tenants. And this is the ground floor balcony, you see outdoor ceiling fans, like nobody does this kind of stuff, but it, again, it allows us to collect more in rent than neighboring properties.
LVT, luxury vinyl tile flooring in the bathrooms. Again, beautiful vanities. Couple of bathrooms had showers. This is upstairs “penthouse” basically. Again, huge balcony, ton of natural light, beautiful hardwood floors, pantries… The rest of the apartments upstairs had a different hardwood floor. This is the floor that I like to use in most of my projects is a 3/4 inch hardwood floor. Again, beautiful light fixtures, brand new, walk-in closets, multiple layers of shelving, which, again, if you're not doing this, start doing multiple levels of shelving in your closets. It doesn't cost that much more, but it's way better use of space. Also, when you take pictures of your properties, close the toilet seat. This isn't one of our best pictures. If you're taking pictures, close the toilet seat, and if you're going to put pictures online, okay? Brand new laundry units.
So, it turned out really, really nice. We rented all six units. We rented five out of six units before the drywall was finished. That's how much people wanted to live in these apartments. And then, the last remaining unit, number six, got leased about a week ago. So, the building is fully leased, fully occupied.
Let me walk you through our numbers. Okay? All right, so, I'm going to log into my account, and this is where I really need you to start to pay close attention because I'm going to go deep and I'm going to show you some numbers, and I'm going to show you some tricks that I use to really be able to run my business more efficiently. If you pay attention, this is really going to pay off for you.
So, one of the things we've added recently to Rehab Valuator is, on My Deals screen, you're now going to be able to toggle between potential deals, active deals, and archived deals. With my archived deals, what I've started doing is projects where I've been keeping track of costs, my final versions of those projects, I've been saving them and archiving them. And so, these are some duplexes that I finished recently, and if I want to pull up and see what my exact costs were on the duplex, I have them right here.
So, I'm going to go to my active deals, and active deals is really for projects that you're currently already running and keeping track of costs on, or projects where you're getting ready to buy them, you're lining up financing. The potential deals is for any deals that you're evaluating but maybe you don't have under contract yet. So, I'm going to go to my active deals and I'm going to click on my 808 North 21st internal final model.
So, one of the things to point out is, if you can get the land cheap or if you can get the land for free, and if you really understand your numbers, even if you go over budget and if you make some mistakes, you're still okay, because look, my total cost basis in this project, even after going over budget, is 72% of the new value after this project is finished, which is $900,000. So, I have a ton of built-in equity going into this deal and pretty nice monthly cash flow.
I'm going to click on Construction Budget. And so, again, you'll notice I have three tabs, Plan, Track, Transactions. Under Plan tab is where I have my budget built out. Now, I can condense all this. So, I've got soft costs and I've got hard costs. Under soft costs, I have architectural, mechanical engineering, plumbing, and civil drawings, I have permits, survey and engineering fees, and holding costs. Everything is then broken down.
So, these are budget groups and these are budget items. So, under budget group holding costs, I have real estate taxes, builder's risk insurance, liability insurance, utility payments, just as an example. Under hard costs, hard costs is everything that happens once we actually break ground, these are my categories, these are my budget groups, and within each budget group I have them broken down. So, under utilities, sewer connection fees, water connection fees, et cetera, et cetera. Under framing… And so, you can create this yourself very easily, and once you create this template once, you can reuse it over and over again.
So, this is my budget. First of all, when I go to seek financing, one of the things that my lender will ask me for is a detailed budget. So, I can simply click this little print icon and I can click print budget and it creates a PDF document just like this. I'm going to include this in my funding presentation. In this video I'm not going to take the time to show you how to create a funding presentation, but obviously with Rehab Valuator, I use it to raise millions of funding for my projects. And so you can easily create a funding presentation for this project. But this is what the budget looks like. This is what goes to my lender. Okay?
So, my budget is here. Now, the other cool thing is, let's close this and reopen it because I want you to see all of my detailed costs broken out. I'm going to close it. Let's go back in. The other thing that I have here is if I click this little button, show bids, a lot of my bids I've stored here. So, for example, for electrical, labor and wire, I had two bids. I had a $37,000 bid from somebody, and then I had a $24,000 bid from somebody that turned out not to be available anymore, because his prices were too good to be true. But I can also click on his bid and click on preview document, and I can see a copy of his bid right here. Alternatively, I could also click on this little attachment icon, and here are all my files, broken out by bids and by receipts. I'll show you the receipts in a second.
So, all of my bids are stored here. All the bids that I basically finalized, I can click a little checkbox and click, make them green, so that I know I don't need to go and get additional bids for that item. So, this was my budget.
Now, as my project was happening, I recorded all of my transactions, and recording transactions is incredibly easy, but the beauty of why this works really well is because every transaction I record gets assigned to some item in my budget. So, I can track every dollar that I spend, every dollar that I spend, against some line item here in my budget. And so, in real time, I know where my project stands, what I've spent and what I have left to spend. Obviously here I have ability to actually upload copies of my receipts. I can search. I can search by keyword, I can search by contractor, by check number, et cetera, et cetera. We have tutorials and all of this So, and adding transaction is incredibly simple.
So, all of my transactions, this project is done, all of my transactions are already entered. I did this myself, but I'm setting up my bookkeeper now to do this. If you're using QuickBooks for now, there's going to be some redundancy, because you do this in QuickBooks and you do this here. But I don't use QuickBooks for my projects, I just use this. So, now my project is done, all my transactions have been recorded. I could have had a virtual assistant go in here and do this, my bookkeeper could have done it, but I end up doing it myself, because I like to vet all my invoices before I pay them.
So, now I want to see how this project turned out. I'm going to click on Track, and for now, let's hide dollar per square foot. So, let's look at this. Again, you really have to pay attention, and for me, I had to really take my time and analyze this data to see where mistakes were made. So, you can see my budget was 625, my actual is 617, but I actually still have about a $6,000 invoice that I haven't paid yet. So, it's going to be a little bit higher.
So, on the face of it, it looks like I actually came in under budget. But if you look, I had a $35,000 contingency here that I really only put in here for safety measures. I wasn't really planning on hit this contingency. I thought I had my project pretty accurately budgeted without this contingency. But you can see, I have three grand here in contingency, but on a lot of cost items, I went over budget.
So, let's do this. And this was my workflow. Let's condense all of this. Let's open up soft costs. So, you can actually see, before we even open up soft costs, you can see it looks like I saved about three grand from my projections. So, if I open up soft costs, now I can see, okay, my architectural was basically on budget. I saved a little bit of money on the permits versus what I budgeted, and most of my savings came from my estimates on survey and engineering fees. I had some consulting fees that I didn't have to pay that I thought I would have to pay, and if I condense my survey engineering fees, I also saved some money on my insurance. So, I can see exactly where I over-budgeted.
But now, if we expand my hard costs, here are my variances. I can immediately go in… And so, the $6,000 invoice that I have to pay is going to be for my security system, for my camera system. So, this $5,000 positive variance, when my last invoice gets paid, is going to turn into a minus 1000 roughly, it's going to be negative variance, so I'll go a little bit over budget. But I can see my biggest cost variances are in framing, drywall and paint, and in grading and landscaping. So, if I open up framing, I can see that my lumber went way over budget. So, I can tell you exactly…
Now, I look at this and I say, “Holy crap, how did I go 12 grand over budget on my lumber package?” Well, I can click on lumber here, and this opens up every transaction I've paid that I categorized as lumber. And that can tell you where I went over budget. Look at my PVC decking, five grand, my Trex railings. So, what ended up happening was, I normally put sol-treated deck railings and sol-treated decking on my back decks, but this time around I wanted something that is more maintenance-free. With my sol-treated decking and railings, I have to re-stain and re-paint them every two to three years, power-wash and stain, and over time that adds up. So, this time around I chose to go over budget because I wanted to install basically composite material decking and railings that will be maintenance-free for 10, 15, 20 years, I won't have to touch them. So, I ended up spending a lot more money than I budgeted on my deck materials. So, that's one.
My labor ended up going over budget because we had some extra framing that we had to do, but that's framing. So, I know where my cost overrun was in framing and I know why that happened. The other thing was drywall and paint. Look at this, I went over budget by 10 grand. So, again, here, I know where most of my money got overspent, this was in labor. In fact, as we had to do some fireproofing that I didn't budget for, and we had to do drywall in stages where I had to have labor come back three or four times, because we had to wait on trades to finish what they needed to finish. So, I ended up spending a lot more money on drywall labor than I anticipated because of the complexity of the project. So, this was my big cost variance.
And then, I massively under-budgeted what paving my parking lot was going to cost. This is the first time I've ever had to pave a parking lot, so I didn't really understand all the site work that was involved, and how much stone we would need to put under the paving, et cetera, et cetera. So, I massively under-budgeted my paving. Thank God I had this contingency in here, because really, if I didn't stick a $35,000 contingency into my project, I would've ended up going way over budget from what I essentially anticipated this project would cost.
So, this is the one place where you can look and quickly understand how your project turned out, but there is also reporting that we make available here, inside, so, if you go to View Reports, in addition to all the wholesale and private lender and banker marketing reports here, you've got construction budget, budget versus actual by group, budget versus actual by item, and post-construction project summary. So if I click generate, the first report that comes up is the detailed budget, and then I can include this in my presentation.
But then, here's my budget versus actual by budget groups. This is the big-picture overview of the project. These are budget groups, not individual items. So, I can click over here on variance, and immediately see where my biggest variances were. Framing, drywall and paint, masonry. Again, this is the first time that I'd had to build an all brick building. Oh, and as far as masonry, I can tell you where this money ended up going. It's that retaining wall I mentioned in the beginning, I didn't budget to have to build a retaining wall. So, that's where most of my money went.
And then you've got a more detailed report here by individual line items. And then the post-construction project summary. This is what you, if you have private lenders, if you have partners on this deal, or if you just want to see dollar per square foot, what things cost you? You would go here. This shows, you can select which exit strategy, because I'm keeping this as a rental, it's exit two. My value, my square feet, my land cost me zero. I got it for free. My soft costs were $10.50 a foot. My hard costs were $120 a foot. My total project with land cost me 131 a foot. Total cost 617, 68% of after repair value, and so I have about 31% sweat equity in this project. That's pretty great, actually. That's a great, great number.
So, here's what I did after I did this analysis. I go back into my budget, or actually, I'm sorry, I don't go into my budget. So, I have this data now and I want to be able to use this data to predict costs accurately for the next project. So, what I'm going to do is, first of all, I'm going to leave this alone, because this is the snapshot of what my deal looks like, exactly at the finish of the project. But I'm going to click save, and I'm going to click clone this deal, and I'm going to call this 808 North 21st Modified Budget for Template. And I've already created this so I'm going to show you what this looks like. Let's go back to my deals. Let's go to active deals.
This is important, this is my workflow. I went in here and I made this budget much more granular, because that's the only way that we can get better, is we can learn from every project and get more granular with our projections and analysis. So, before, I had one big lumber category. I went in, and I broke that category down into lumber for main structure, zip board, which has exterior sheathing, front porch and back deck lumber, railings, PVC decking, and then I broke out my labor in more detail. Labor for main structure, labor for front porch, labor for back decks, et cetera, et cetera.
What I did was I came in here and I made rules. So, you can click on this a little more. This is your overall project, total square feet. But you can go in here and create individual measurements, square feet of concrete interior, porches. These are shortcuts. So, now, I can budget things and I can create rules where I can say, okay, pouring my concrete slab costs me an average $2 based on square feet of concrete. See this? How many linear feet of Trex railing do I have? Well, normally I pay for materials about $45 per linear foot. So, I turn my actual costs into rules.
I hope you can follow this. Again, this is not for beginners, but if you're actually doing projects, this is how you get better at predicting your costs. My labor for my main structure is based on total square feet, 372 a foot, et cetera, et cetera. So, I go in here and I make my budget more granular, and then I create rules for myself. Masonry, I broke out every cost item.
So, now I have this granular budget created and I put my actual costs as my budget items, because now my budget line items are what things actually cost me. Now I can do one of two things. I can just clone this deal for my next project, or I can click on Template and I can create Save as Template and I'm going to call this New Build Multi-Family Template, and I can date it, just so I know how current my costs are, and I'm going to click okay.
So, now, when I get ready to start a new deal, I'm going to click here, New Deal, and I'm going to click New 14-unit Project. I'm going to click save. Let's put in total square feet, 10,000 square feet. I'm going to go into my budget. First of all, let's switch this to construction. I'm going to go into my budget, click on Detailed Input, and instead of building this budgets from scratch, I hope you're paying attention here, if you're paying attention, you will see how powerful this is. Instead of building this budget from scratch, I'm going to click on Template, Load Template, New Build Multi-Family Template.
Boom. Here's my budget. I'm going to go in here and I'm going to populate these categories. So, how many square feet of hardwoods? 8,000 square feet. How many square feet of tile? 2,000 square feet. How many squares of roof? 40 squares. Linear feet of foundation, I'm going to go look at my architectural plans, I'm going to write, 300 linear feet of foundation. 50 plumbing fixtures, et cetera, et cetera. As I fill this out, my budget is created.
Now, obviously, this project is going to have different nuances than the previous project, and I'm going to go in and I'm going to modify my budget, I'm going to take out certain items, I'm going to modify certain items. Maybe I have eight interior staircases here. Maybe I'm going to need a crane for two days instead of one, so I'm going to click two times 1,000 bucks a day, et cetera, et cetera. I can go in here and clear out these bids and populate new bids. But my budget is 90% finished for this new project.
So, I hope you can see how powerful this is. Do one project, analyze your costs in detail, make your modified budget as granular as possible, and then create a template out of it, and then you can budget every future project quickly and accurately going forward.
If any of this doesn't make sense, leave me comments at the bottom. Leave me your questions. But if you actually put this to work… So, now my budget is created, I'm going to go in here and I'm going to start populating my transactions as I start paying for things, and I'm going to assign transactions. Let me go here. Let's assign this to, site work, scraping lot, boom. Full scrape and haul. I'm going to pay this to one of my contractors, that are pre-populated. My payment methods are pre-populated, et cetera, et cetera.
So, if I go to My Deals and Project Management, here are all my vendors stored in here, and here are all my templates. If you are a premium member, you have access to some public templates that I've made available based on my own costs. These are just for reference. I don't want you to use these as actual costs for your project because my costs won't match yours, et cetera, et cetera.
So, put this to work. I hope I didn't go too fast, but the Project Management Suite is probably the most dynamic but also a part of our software that takes a bit of a learning curve, but it's incredibly, incredibly powerful if you simply put it to work.
So, before I let you go, here's what we're working on for the next release of Rehab Valuator Premium. There's going to be a revised budget column in each budget so that as you're doing your project you can keep your original budget column untouched, but then as you encounter new costs or maybe you're able to save some money, you can modify your revised budget column and keep track of what your new budget is for each project.
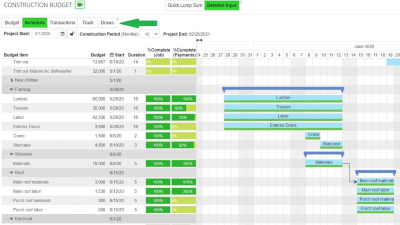
We're also coming out with project schedules, which is huge. It's taking a lot of development for us to bring this to you, but you're going to be able to create full-blown schedules for your projects based on your entire budget. We're going to have rehab and construction draw functionality where you'll be able to create draw requests, and you're going to be able to track your draws, and do full project analysis based on that. So, we're adding more and more features to allow you to do full project management of your deals, start to finish.
Oh, and also working on an enterprise version, you're going to be able to add multiple users to your account. Again, a lot of development, but it's going to be really, really awesome for those of you that have teams, virtual assistants, employees, project managers, et cetera, et cetera, you will be able to create separate user logins for those team members.
The link that you see at the bottom, rehabvaluator.com/developers, that's where a lot of our content on real estate development is. Highly recommend you go over there and watch the multitude of trainings that we have available there. Nobody else is really making this kind of stuff available.
We're also working on a couple of other really important updates to the software as well as a bunch of smaller sort of minor updates, but all geared towards making your life easier and making you faster, smarter, and more efficient.
So, here's what you should do next. Leave me your comments, feedback, questions below. If you already have Rehab Valuator Premium, put what I showed you to work, start using this. If you do not have Rehab Valuator Premium yet, you can sign up at rehabvaluator.com/upgrade. You'll get the full project management functionality, full reporting ability, ton of other features and benefits, and you're also going to get a big, big bonus package of real estate investing education. So, go to rehabvaluator.com/upgrade and sign up. All right, thank you for watching.
Next Videos
Replay: Project Management Deep Dive Training

New Construction Flips, Rentals and Commercial

Excellent work keep up with the good work!!!!!
Terry – this is probably the best video to watch: https://rehabvaluator.com/case-studies/commercial-rehab-purchase-financing/
Appreciate the compliments, Godfrey!
Hi Frank. This was built in Richmond, VA
Thanks, Carol!
No. I was the GC on this project.
This material is meant also for the Premium users. It’s a tutorial on how to use the software effectively for project management.
Sorry about wasting your time but I already have the Rehab Valuator Premium . I thought you might be offering new materials.. Like how to buy apartments.
Thanks, Charles!
Thanks, Kevin. That’s a great suggestion! I’ll add that to my “content to record” list soon
Hi Linda,
Unfortunately, we do not have a UK version or package of the software.
Do you have one for the uk market, in England?
Wow so much to learn but glad that it is there to go over as many times and step by step as needed
I just signed up with Premium and can see the value – i’m an experienced developer, general contractor and real estate broker now looking to simplify my work and do deals on my schedule without a lot of infrastructure. This program appears to provide a platform that would work for me. I’ve done a lot of work in Richmond over the years and think it is a great City. Reminds me of my home town with hills!
what do you think about including an “Undo” button (with a history function)?
Well done!
I really like this tutorial on new construction. You really hit on the points of interests that I think most people ask about. One request I have Daniil is maybe a training video on the process of selecting your construction team. How you go about sourcing them if you are new to this industry. Otherwise, excellent video.
Excellent!
Daniil, you really put together an extremely useful software program for builders and rehabbers. Great work! Since your software is being used across the country, having a table available on pricing adjustments around a USA mean standard for different areas might be useful in creating an initial budget.
Hi Amon,
Thanks for the kind words! We are glad you are enjoying the software and tutorials!
Awesome training that exhibits the value and power of this software. Being able to create rules is outstanding! I am so glad I chose to be a part of this team and look forward to getting my early mistakes notably corrected for my templates! Great job Daniel and team. Thanks
Hi Vincent, thanks for the compliments! Please check out our subscription options via our pricing page. If you have any further questions, please reach us via email. You can reach us at support(at)rehabvaluator.com.
This is great. I could have used it years ago but will take advantage of it now. I’m starting over. How much to upgrade? I paid for my copy, if you will a number of years ago. I have used it to make great presentations but after losing three houses in N.W.,D.C. and starting over my credit isn’t what it use to be. A 695 score now and working on getting it much better.
Hey Terry Andrews Here
I have a 6000 sqft commercial building with three doors with three different address I wanted to convert into apartment or condos what video training of your would you recommend to come up with a plain to raise money to fix up the place and how to structure the deal to get a cash flow
Great stuff!! Yoh always share great content!!! Never disappointed! Thank you
Congrats great work
Where did you build this 6 family bld it makes a big difference on location densely populated city
Did you hire a general contractor?
If so, where is the budget category for the general?
If you did hire one was his compensation based on square feet or a percentage of the total costs?